
Course Breakdown: Champion Hill holes 1-5
Champion Hill has been one of my favorite courses ever since I played it in high school golf tournaments. Back then, I knew this course was a blast to play because it was fairly wide open and had a lot of undulations and interesting hole designs. In the last 5 years or so, I feel like this course has received more and more recognition for how great the design really is. I’ve been calling it a discount Kingsley Club for years. The biggest difference is that each course was designed to be played at different speeds. If Champion Hill’s greens were running at Kingsley Club speed and firmness, it would be borderline unplayable. I would absolutely love to see the carnage it could bring, but for everyday golf, the greens should be around an 8 on the Stimp.
I will be breaking Champion Hill down from the blue tees. As always, I’m not afraid to give constructive criticism, and I think we need to add another tee box or combine tees to create a more accessible option. On the scorecard, the blue tees are nearly 6900 yards, which is a lot of golf for the vast majority of players. The next longest tees are the whites at 6100 yards. I feel like a tee box around 6450 yards would be a perfect stepping stone between championship length and near-senior tees. I don’t think I’ve ever seen the blue tees set up to approach 6900 yards, but I do think an additional tee box is necessary.
Unlike our last couple of courses, there aren’t as many areas where you have to avoid trouble. A bomb-and-gouge strategy works quite well here. You do want to avoid the rugged fescue grass, but if you can find your ball, it is usually playable.
If you haven’t played Champion Hill or if it’s been a few years, I strongly suggest you take the trip out to Honor, Michigan—especially after reading this breakdown!
CH #1
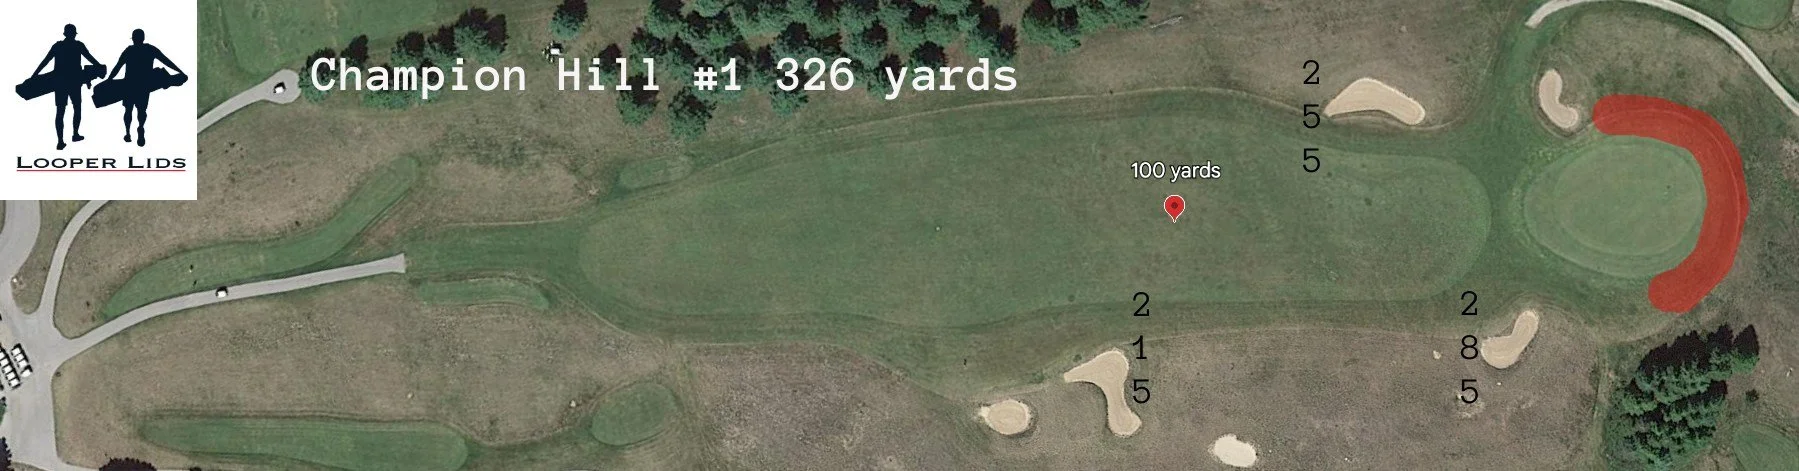
The 1st hole at Champion Hill is a near-perfect starting hole according to the philosophy of Greg Lueck. “A starting hole should be the easiest hole on the course. You want the 1st to be a warm-up hole and allow groups to move along quickly to maintain proper spacing,” he preaches. Whether or not you agree with the philosophy, this hole is the easiest on the course at only 320 yards from the blue tees.
The fattest part of the fairway is between 215 and 255 yards. For those just trying to find the fairway, lay up short of the left bunker at 255 yards. For those feeling a little frisky, favor the right side of the fairway, and you’ve got room until a bunker at 285 yards. It isn’t necessary, but sometimes you just have to smash the driver.
The green complex slopes from right to left and drops off beyond the green. Long of the green is where you definitely don’t want to miss!
CH #2
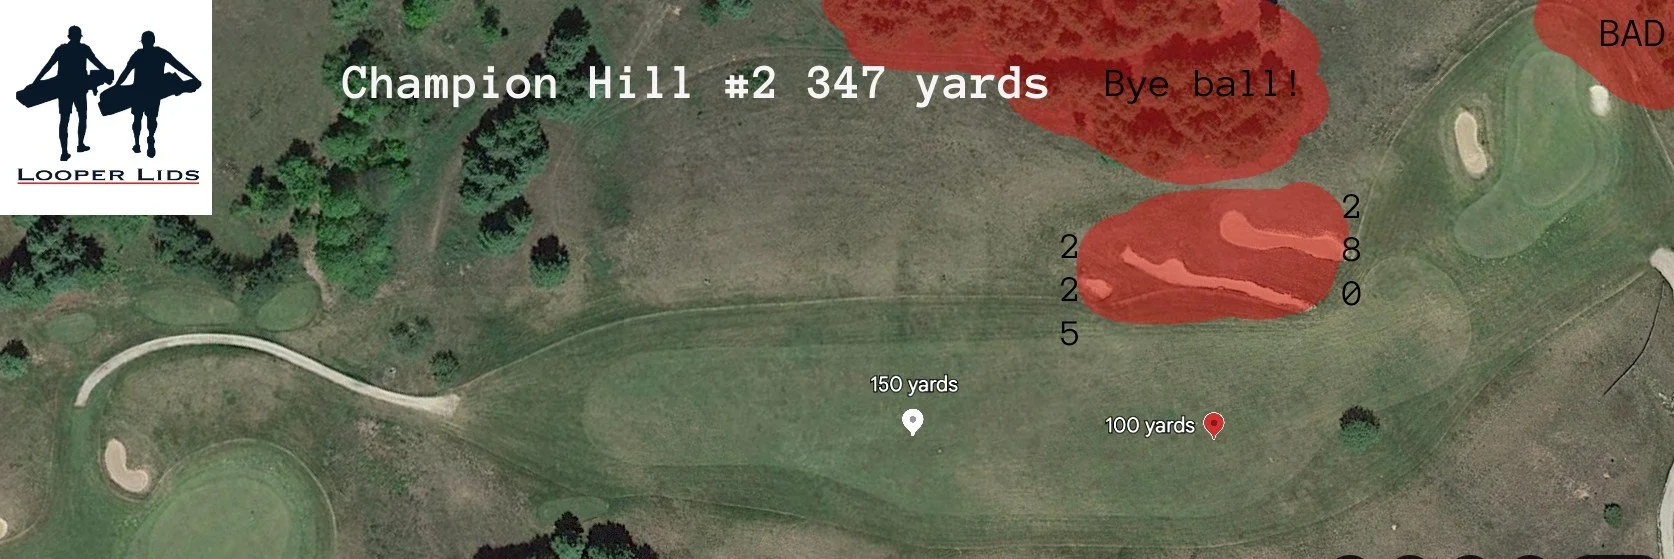
The second hole might be my favorite on the entire property. While it doesn’t have the stunning views of some of the other best holes, the design itself is excellent. This dogleg left tries to entice golfers into making a poor decision off the tee. Usually downwind, the thought of trying to carry the left bunkers to hit a tee shot greenside can creep into your mind. This, however, simply isn’t the percentage play.
Even if you manage to carry the left bunkers (280 yards), the green complex isn’t very welcoming from this angle and will require another REALLY good shot to execute. The smart play is to aim your drive at the right tree (280 yards). With the total hole being only 350 yards, you don’t need to hit driver, but I also don’t think there’s anything wrong with using it as long as you stay right, due to the angle of the green. The right side is simply so much more inviting for approach shots.
The miss to this green complex is short and right. You don’t want to be in either bunker, and if you happen to miss long, the terrain runs steeply down into a ravine—not where you want to be!
CH #3
Up until the last few years, I always played the white tees when I played here because that’s what the rest of my group preferred. Now, I prefer to play the farther tees, and this hole was eye-opening. I didn’t even know where the blue tees were or how to get to them, and when I finally found them, I had to race back toward the fairway to figure out where I was going because I was completely lost.
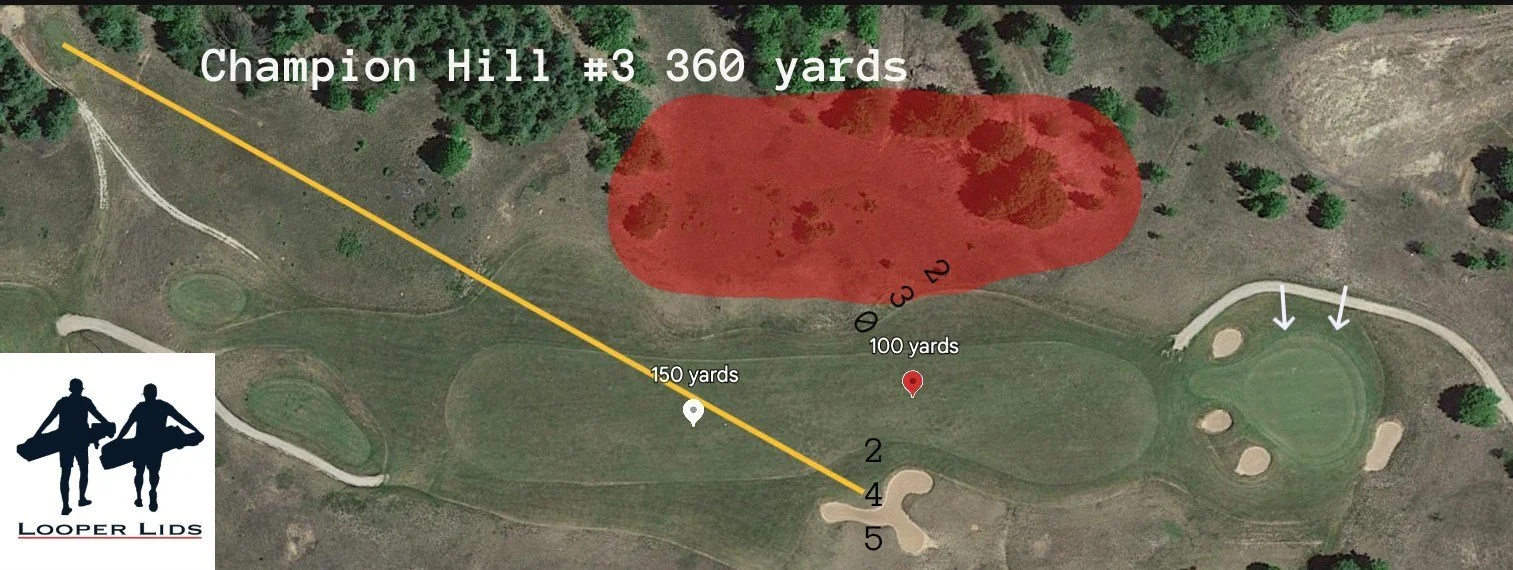
Luckily for you, you’re reading this, and I’m going to tell you exactly what to do! The tee box sits 60 feet below the level of the fairway, and you're completely blind to an angled fairway. All you can see are some bushes on the hillside. If you split the right and left bushes, there’s a bunker through the fairway at 245 yards. With the uphill, this plays closer to 270 yards.
You can aim left of this line and try to get past the bunker, but you're bringing the risk of missing left into play. From the overhead view, you’ll see this area is marked red—for good reason, because you don’t want to be there at all! A good aggressive line is just left of the left bush, but on this line, you’ll need to carry the ball at least 230 yards to clear this red-marked area. Risk/reward!
My plan is to hit a 250-yard shot over the left bush, hoping to leave myself around 125 yards remaining. This eliminates the bunker miss without bringing the left miss too much into play.
The entire hole climbs up to the green, with a 150-yard shot playing 24 feet uphill (add 8 yards), and from 100 yards, it’s 12 feet uphill (add 4 yards). The green complex slopes from left to right, and you can see some pretty crazy bounces from left to right, so don’t be afraid to favor this side of the green.

CH #4
One of my favorite tee shots on the entire course, this hole just sets you up to try and wail on one! This longer par 4 doesn’t have much trouble other than the fescue grass, so this breakdown will be short and sweet.
For the bombers out there, the fairway begins to tighten up around the 275-yard mark. Even if I’m bringing this into play, it isn’t worth hitting a shorter club off the tee. Personally, my misses get tighter with a shorter club when hitting approach shots, so on the risk/reward spectrum, this is worth the risk to me.
The last third of the hole slopes pretty hard from left to right as it creeps toward a hillside. A miss to the right is probably better than left, just to avoid getting an awkward lie and to be able to chip into the upslope instead of the downslope.

We go from one of my favorite tee shots to my absolute favorite tee shot with the par-5 5th. From tee to green, this hole drops 78 feet. Combined with how short the hole is to start (445 yards as the crow flies), this is a birdie hole with hopes of getting a big birdie (eagle, sorry I’m a nerd).
The tee shot is sneaky tough. As mentioned, it plays way downhill, and the most direct route to the green has a giant hill and fescue area starting at 255 yards. Any shot going further than 255 needs to be aimed more left, because you really don’t want to be on this hillside. Interestingly, from the 255-yard mark, you’re only 190 yards from the green, though you wouldn’t be able to see it.
The further you hit the ball down the fairway, the more the fairway slopes off to the left and away from the green. You essentially aren’t getting any closer to the hole, but your angle and vision improve the further you hit the ball down the fairway.
If you’re forced to lay up, you want to try to hit your shot up the left side of the fairway. I haven’t mentioned it yet, but the green complex is the hole’s major defense, and the left side of the fairway gives you the best angle of approach to this green.
On your approach, expect your ball to land and kick left. Because this hole is shaped around a giant hillside, it’s hard to see or feel how severe the green complex is, as it appears flat compared to the rest of the landscape. Using Google Earth, I calculated that the entire green complex sits on a 6% right-to-left slope. It doesn’t sound like much, but the general rule of thumb for pin locations is that they shouldn’t sit on any slope above 3%. There isn’t a spot on this green that is less than 3%.
The real decision when hitting your approach is how aggressive you want to be aiming up the right-hand side, knowing this information. If you aim too far right and stay above the slope, you’re looking at an impossible recovery shot. Or you could aim at the middle of the green and live with the potential of missing left, but leaving yourself in a position for an easy up-and-down. These decisions are what make or break a round of golf.
It goes without saying that this green breaks a lot. When I read a putt on this hole, I basically double how far I think it’s going to break. If it looks like 3 feet, I’ll play it 6.